Here’s How to Curl Your Hair At Home Like a Pro Stylist


Cortney Clift

Whether you're struggling to reach those pieces way in the back or you can't quite figure out the best way to grip a hot curling wand, curling your hair isn’t always a seamless experience. No matter what hot styling tool you're using (straightener, blow dryer, curling iron, etc.) there will always be a bit of a learning curve. That curve has only been made steeper by the variety of curling tools we have available to us today. There's a lot to learn, but once you practice and master the technique, you’ll be churning out beach waves and curly hairstyles like a celebrity hairstylist.
Below, we’re sharing three different tutorials on curling hair, courtesy of Christine Thompson, co-founder of Spoke & Weal and celebrity hairstylist Nunzio Saviano. One method will give you loose, beachy waves and the other will create tighter ringlets. Once you master these techniques, we even have a tutorial to create effortless-looking waves using a flat iron (yes, really!). Ready to create your dream curls? Let’s get started.
It's about glam time you treated yourself.
Join IPSY

MEET THE EXPERT
Nunzio Saviano is a celebrity hairstylist and owner of Nunzio Saviano Salon in New York City.
Christine Thompson is co-founder and master colorist at Spoke & Weal, a cutting edge hair salon with multiple locations across the country.
Choosing the Right Curling Tool for You
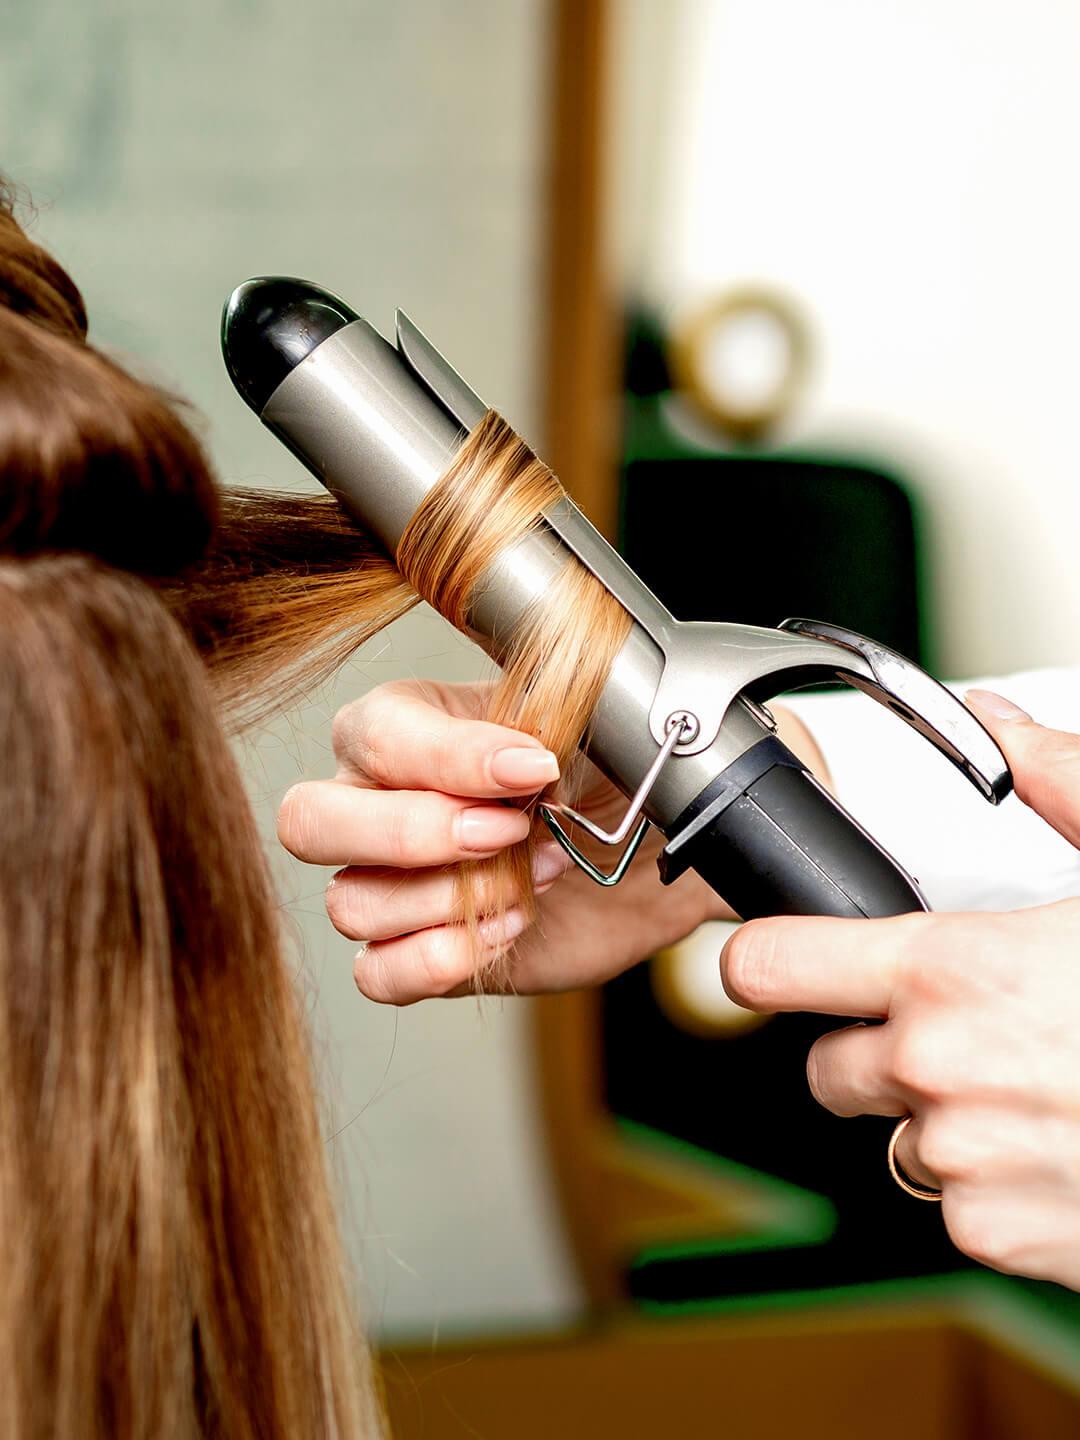
The first obstacle to tackle is whether to use a curling wand or a curling iron. Both have their perks. "A curling iron has a clip on it so that hair can be clipped in to finish curls through the ends,” explains Thompson. However, she says, “This can look retro or dated depending on how you curl.” There’s a big difference on the wand. “A wand has no clip and is easier to use for most people. The wand heats up and you wrap your hair around the barrel holding the end of the section,” she explains. Plus it may be the preferred tool for beach waves. “It leaves the ends straighter, which gives more of a beach curl or wave effect. I have more success teaching guests how to curl and wave their hair with a wand rather than an iron–especially for beachy waves,” she says.
There are also several different curl barrel sizes, which determine how tight or loose the curl shape will be. Not sure what you need? Not to worry, we’ve got a guide:
.5-inch barrel: A small diameter can help define curls for those with natural curls and coils. “The smaller the wand size, the tighter the curl pattern result,” explains Saviano.
1 inch barrel: "If you are just going to have one iron or wand I suggest getting a one-inch barrel,” says Thompson. “Then you can use larger sections of hair for a looser curl or wave and smaller sections for a tighter curl.”
1.25 inch barrel: “If your hair holds curls very well, go with a 1.25-inch barrel for a loose beach wave look."
1.5-inch barrel: The barrel can go even bigger, especially for those with long hair. “This is dependent on the curl size and pattern since curls are so unique, but my go-to is a 1-1/2” barrel for mid-to-longer hair looking for a beachy, tousled wave,” says Saviano.
What You’ll Need for Perfect Curls
Here's everything you’ll need to curl hair like a pro:
A curling iron or curling wand: A tool made of ceramic and infused with tourmaline is less likely to cause heat damage.
Heat protectant: These hair products shield strands from damage caused by hot styling tools. One of our favorites is OUAI Heat Protection Spray, which is made with thermal polymers to help create healthy, frizz-free curls.
A hairbrush: Use a gentle brush that glides through wet or dry hair easily.
Hair sectioning clips: Clips make pinning up sections of hair super fast and seamless, especially with hard-to-reach spots.
Hairspray: By using a flexible hold hairspray you can preserve your hairstyle without losing natural movement, soft texture, and shine.
3 Different Ways to Curl Your Hair
Curl Method 1: Easy Everyday Curls
This basic method is great for beginners, and will give you a foundation for learning more intricate techniques.
Step 1: Dry and detangle. Make sure hair is completely dry, because curling wet hair will cause breakage. Then, brush hair to detangle.
Step 2: Prep your tools. Choose your curling iron, and pre-heat. “Use a lower setting like 400 [Fahrenheit] for fine hair and 425 for thicker, coarse hair to avoid burning and damaging the hair from excess heat,” says Saviano.
Step 3: Section and protect. Starting at the bottom of your hair, use your fingers to separate a section of hair about an inch in diameter and spray it with heat protectant.
Step 4: Begin curling. Hold the iron vertically, with the tip of the barrel pointing down, and wrap the entire hair strand around the barrel. Hold for a few seconds, then release and let it cool before touching it. Then, continue to the next section, and repeat throughout the rest of your hair.
Step 5: Brush out and set. Once you’ve curled your entire head of hair, lightly comb or brush the curls for a more natural look, and spray with a medium hold hairspray such as DRYBAR The Sheriff Medium Hold Hairspray.
Curl Method 2: The Wavy Wrap-and-Go
This foolproof technique gives you classic curls that you can customize depending on your hair texture and desired look. Brush them out for fluffy waves, run your fingers through them for beach waves, or pin the hair back for a textured updo.
Step 1: Prep your hair. Start by running a brush through the hair to make sure it's tangle-free. Next, apply a heat protectant throughout, making sure to check if your product is designed for wet hair, dry hair, or either. If you are starting with wet hair, Thompson says, "Do not blow dry the hair straight first. Rough-dry it, diffuse it, or let it air dry naturally with product and scrunch it a little to help create or enhance natural texture. This will help keep the curls formed throughout the day."
Step 2: Section your hair. Follow your natural part and tie up one side in a ponytail. On the side where the hair is still free, create a horizontal part just above your ear and clip up the top half. Then, vertically split the bottom half into two sections, clipping either the front or back section. (Whether you curl from front-to-back or back-to-front is up to you!)
Step 3: Begin to curl hair. Grab a one-inch piece of hair from the section that’s left free. Hold the wand horizontally and wrap the section of hair you're working with around the wand. The exact size of the hair sections you curl will depend on your hair thickness and hair type. "If you have straight, fine hair, use smaller sections," Thompson says. "If you have hair that holds curls well, use larger sections of hair."
For loose curls or waves, hold each curl on the wand for 5-8 seconds at most, then release.
Step 4: Cup or clip your curls for maximum hold. For a tighter curl, or if your hair does not typically hold curls well, cup the coiled curl in your hand while it cools to really lock it in the new shape. For even more hold, you can also pin the coiled curls to your head to allow them to set. “Clipping your curls will 'hard set' them, creating the maximum curl," Thompson says.
Step 5: Continue the process around your head. Repeat steps 3 and 4 throughout all sections of hair. For the most natural look, alternate between curling one-piece forward (toward your face) and the next backward (away from the face). However, curl the face-framing pieces away from your face.
Step 6: Customize your curls. Now that all of your hair has been curled and set, it may look a little bit ringlet-like. Don’t worry! For a piecey wave effect, Thompson recommends "running your fingers through the hair to break up the curls into loose waves.” According to the stylist, "This is the best tool to achieve beach waves."
If you're after a softer, more voluminous look, you can instead brush through your curls—but the brush you use can make all the difference. Thompson says a mixed bristle brush (like a Denman brush) will create a slightly fluffy effect. "The more space there is between the bristles, the less fluffy your hair will be," she says.
You can also opt for a wide-tooth comb or a paddle brush to create more volume. For the biggest, softest, full-bodied curls, use a mixed-bristle brush like a Mason Pearson.
Set 7: Set your style with product. A hydrating curl cream (such as VERB Curl Cream) can be your best friend. According to Saviano, they help “deliver moisture and shine to the hair and eliminate frizz without weighing the hair down or interfering with the curl pattern.” Finally, add a final mist of hairspray around your whole head to really lock in the shape and shine.
Curl Method 3: The Twist-and-Turn for Tight Curls
If loose, beachy waves aren't your thing, try this technique for tighter curls and more defined ringlets.
Step 1: Prep and section your hair. Prep your hair with heat protectant, and section hair following the same steps listed in Curl Method 1.
Step 2: Brush and twist. Take a one-inch section of hair and spritz it with a bit of hairspray (or, spritz on after you curl if you have damaged hair). Then, manually twist the section from the root to the tip. Keeping that twist intact, wrap the twisted section around the barrel of the curling wand in the same direction that you twisted the hair (either towards or away from the face). To get that beautiful S-shaped spiral, you’ll want to hold the curl a bit longer, about 10-15 seconds. Then, pin to cool and set.
Step 3: Continue the process around your head. Working with one section at a time, repeat step 2, wrapping the twisted strand of hair around the curling iron in the same direction until every piece has been curled.
Step 4: Style and set it. Wait until your hair is totally cool to start unpinning each individual piece. Then, flip your head over and shake it out to slightly loosen the spirals and create volume. Lightly spritz just a touch more hairspray on the hair to help your curls last for days.
Want curl products (and much more!) delivered to your door each month? Take our Beauty Quiz now to get started. Already an Ipster? Refer your friends to earn points, which you can use toward products. Either way, don’t forget to check us out on Instagram and Twitter @IPSY.
Like this article? Share it with your friends by clicking the icons below!
Liked this post? Share!
Related Stories


Hair
Thinking About Cutting a Bob This Summer? Start Here!
5 min read


Hair
Are You Leaving Your Conditioner on Long Enough?
4 min read


Hair
E.L.F. Just Entered the Hair Chat—Here's Everything in the Collection
3 min read


Hair
Heat Wave? These 12 Summer Hairstyles Are the Move
5 min read


Hair
The Best Bob Cut Haircuts for Every Face Shape, Hair Texture, and Styling Routine
7 min read


Hair
Ultra-Long Hair Is Everywhere Right Now—Here’s Why
3 min read


Hair
13 Blonde Balayage Looks That Prove the Hair Color Trend Is Here to Stay
3 min read
Hair
Brown Hair Color Guide: How to Choose the Right Shade, Undertone, and Style for You
10 min read

Beauty Picked Just for You
Get 5 products worth up to $70
Exclusive access to epic deals up to 80% off
Starting at just $15/month. Cancel anytime.