Now You Can Have Glazed Eyelids to Match Your Donut Nails

Did somebody say glazed donuts? We’ve been throwing around the term quite a lot lately thanks to the queen of the glazed beauty trend Hailey Bieber. Between glazed donut nails with chrome dust taking our Instagram explore tabs by storm and glazed, dewy highlighted cheeks being our summer makeup look it's only natural we continue the trend in the name of beauty.
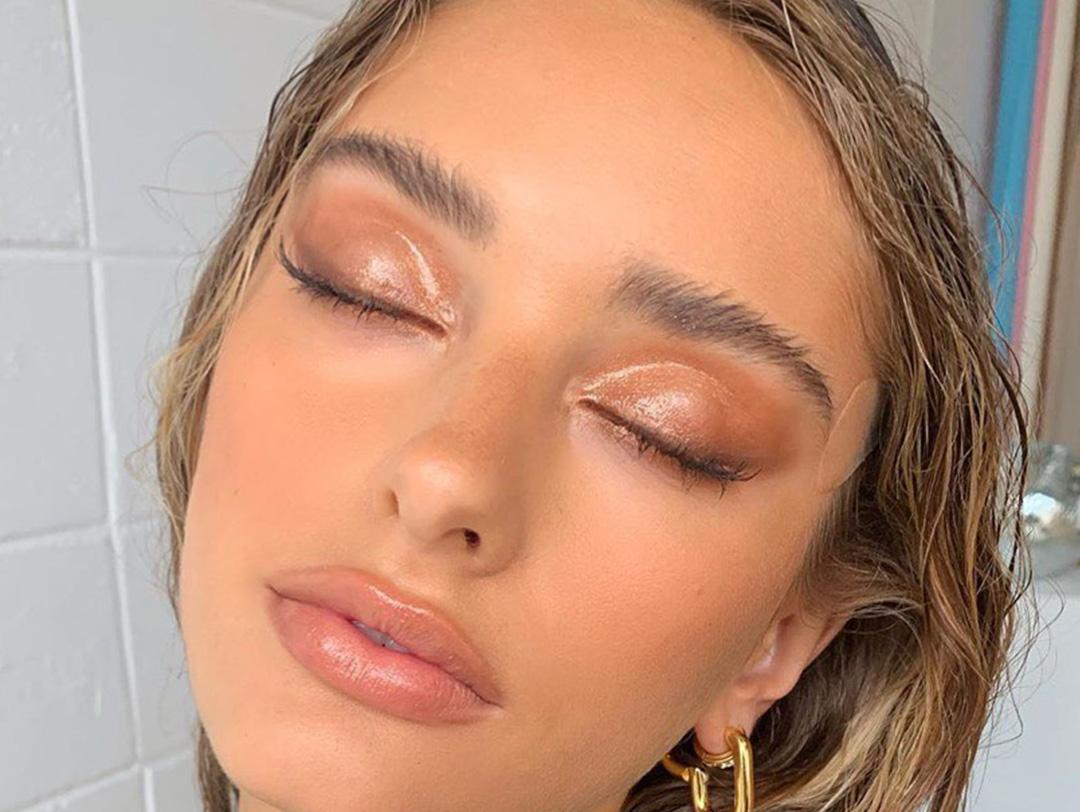
Imagine a delicate layer of sheer shimmer delicately draped over your eyelids, creating an ethereal glow that catches the light with every blink. Glazed eyeshadow effortlessly adds depth, dimension, and a touch of enchantment to your eye makeup looks, whether you are opting for a subtle daytime glow or a mesmerizing evening allure. Interested in getting this glossy look? Look no further and read our step-by-step tutorial below. Plus, we’ve added some great product recommendations to help you nail the trend.
It's about glam time you treated yourself.
Join IPSY

Behind the Glazed Eyeshadow Trend
The glazed eyeshadow trend, drawing inspiration from the art of glass and all things shiny and glazed, has been changing the way we approach eye makeup as of late. With its smooth, gel-like texture, and a range of reflective finishes, glazed eyeshadow captures both the subtlety of a watercolor wash and keeps things fun. Plus, it’s letting us use more of our makeup products in a multipurpose way. Like, using liquid highlighter on our eyelids.
Instead of using a shimmery or metallic eyeshadow by itself, the glazed eyeshadow trend is a little more complex. It’s not hard to achieve by all means, but it does require the right products. The flecks of glitter won’t be sparkling, but rather your glazed eyelids will have that ‘wet look’ to them. Almost like that dewy sheen you see when you walk out from a facial or find the perfect skincare.
How to Get the Glazed Eyeshadow Look
Step 1: Prime Your Eyelids
Start by prepping your eyelids with an eyeshadow primer or a concealer that matches your skin tone. This will create a smooth base for the glazed eyeshadow and help it adhere better and prevent fallout for the glazed look.
Step 2: Choose Your Shades
Select a range of complementary eyeshadow shades with a glossy or metallic finish. The key to achieving a mesmerizing glazed effect is to opt for shades that are similar in tone but have varying levels of shimmer or metallic intensity.
Step 3: Apply the Base Shade
Beginning with a mid-tone shade, sweep it across your entire eyelid using a flat eyeshadow brush. This will serve as the base color, providing a canvas for the glazed effect. We like to use a matte powder eyeshadow for this before we put our pigmented colors on next.
Step 4: Layer on the Shimmer
Using a denser brush or your fingertip (we love to use this method), pick up a shade with a higher shimmer level or a metallic finish. Apply it to the center of your eyelid and gently blend it towards the outer corners. The goal is to create a focal point that catches the light everywhere you go.
Step 5: Add Depth and Dimension
Choose a darker shade, preferably in the same color family, with a rich metallic or shimmering finish. Concentrate this shade in the outer corner of your eye and blend it towards the crease. This will add depth and dimension to your glazed eyeshadow look.
Step 6: Highlight the Inner Corners
This is optional, but to further enhance the glazed effect, dab a light, shimmery shade onto the inner corners of your eyes. This will create a beautiful contrast and make your eyes appear more awake and luminous. You can ever use a white eyeliner pencil.
Step 7: Blend and Soften
Take a clean blending brush and softly blend the edges of the eyeshadow shades together. This will create a seamless transition and help melt the colors together, giving them a glazed appearance.
Step 8: Add Finishing Touches
Complete your glazed eyeshadow look by defining your lashes with mascara and, if you’d like, adding eyeliner for extra definition. Opt for a neutral or subtle eyeliner shade to keep the focus on the glazed effect. We love the MAKE Continuum Gel Eyeliner as all of the shades have a nice touch of sparkle within them. The formula is waterproof, smudge proof and long lasting.
Step 9: Shine Even More
For an intensified glazed effect, apply a glossy eyelid topper, highlighter stick, or even a small amount of lip gloss to the center of your eyelid. This will enhance the shine and create a high-shine, glass-like finish.
Looking for more inspiration on trending makeup looks and the latest buzzworthy products? Take our Beauty Quiz now to get started with your own IPSY beauty subscription. Already an IPSY member? Refer your friends to earn points, which you can use toward products. Either way, don’t forget to check us out on Instagram and TikTok @IPSY.
Like this article? Share it with your friends by clicking the icons below!
Liked this post? Share!
Related Stories


Makeup
The Best Hybrid Beauty Products for Low-Effort Routines
5 min read


Makeup
How to Recreate Zendaya's Glowing Makeup From “The Odyssey” Premiere
3 min read


Makeup
We're in Our Eyeshadow Era—These 10 Looks Make It Easy
6 min read


Makeup
CLINIQUE Just Turned Black Honey Into a Full Collection
3 min read


Makeup
MARC JACOBS BEAUTY Is Back—Here's What I Really Think
4 min read


Makeup
A Bombshell Has Entered: Inside Kayda’s ‘90s “Love Island USA” Makeup
4 min read


Makeup
Olivia Rodrigo Is the Blueprint for Modern Pop-Punk Glam
5 min read


Makeup
6 Beauty Brands Reinventing the Packaging Game
4 min read

Beauty Picked Just for You
Get 5 products worth up to $70
Exclusive access to epic deals up to 80% off
Starting at just $15/month. Cancel anytime.