Your Complete Guide to Glitter Makeup That Looks Intentional, Not Overdone
IPSY Editors
Glitter makeup has evolved into a refined art. It's about strategic placement, the right intensity, and understanding finishes—shimmer for radiance, metallic for sleek shine, and glitter for bold drama. From liquid eyeshadow to glitter eyeliner, face jewels, and body glitter, each format has its purpose. Master adhesive tricks, fallout hacks, and removal techniques to keep sparkle wearable, long-lasting, and irritation-free. Ready to master modern glitter? Let’s dive in.
It's about glam time you treated yourself.
Join IPSY

What Glitter Makeup Is and How to Wear It Without Looking Overdone
Glitter makeup is having a serious moment, but there's a real art to wearing it in a way that feels intentional. Learn the difference between shimmer, metallic, and glitter finishes, plus tips for placement, color-matching, and keeping your sparkle looking polished—not chaotic.
Know Your Sparkle: Shimmer vs. Metallic vs. Glitter Finishes
Not all that glitters is the same—and knowing the difference is what separates a polished sparkle moment from one that's just a lot going on. Shimmer uses ultra-fine particles to give skin a soft, lit-from-within glow. Metallic dials it up with a smooth, foil-like finish that's sleek and high-impact. Glitter is the boldest of the three—larger particles, more texture, and serious light-catching energy that's made for a statement.
As a general rule, shimmer is your everyday radiance workhorse, metallic is for when you want that sleek glam effect, and glitter is reserved for moments when you actually want people to notice your eyelids.
Placement matters just as much as the finish itself. An inner-corner dot instantly brightens eyes, a halo of glitter at the center of the lid adds dreamy dimension, and a tap along the lower lash line brings a sultry edge. For the most seamless application, press glitter onto a tacky primer with a flat brush or your fingertip—build it gradually, and you'll sidestep the fallout chaos entirely.
Choosing a Glitter Color Story That Flatters Your Skin Tone
Here's the thing about glitter: the right shade can make your whole look feel effortless, while the wrong one can throw everything off. Start with your undertones. If you run cool, silver, icy blue, and rose gold are your best friends. Warm undertones? Bronze, copper, and peachy gold will feel like they were made for you. And if you're somewhere in the middle, champagne and soft pink-gold are basically universally flattering—lucky you.
Eye color plays into it too. Silver and icy tones create a gorgeous contrast against blue or green eyes, while gold and bronze add warmth that makes brown eyes look rich and dimensional. Whatever shade you land on, keep the rest of your look grounded—a matte lip or soft blush lets the glitter stay the star without tipping into full-on sensory overload.
Now that you know what glitter makeup is and where to apply it, let's talk products—because not all glitter eyeshadow is created equal.
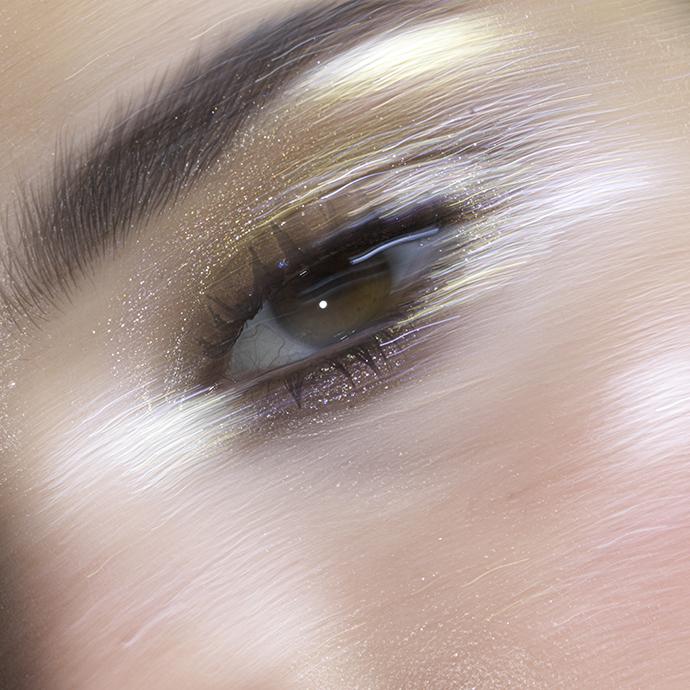
Eye Gloss and Wet Look Lids With Sparkle
Glossy lids are having a serious editorial moment right now, and honestly? We're obsessed. The wet-look eye is one of those trends that looks impossibly cool on screen but feels a little intimidating to actually pull off.
The trick is simpler than you'd think: ditch the chunky glitter and layer your eye gloss over micro-sparkle instead. Dab a small amount of gloss onto the center of your lid (staying away from the crease to avoid transfer), then dust a fine shimmer on top for a finish that looks dewy, dimensional, and genuinely dreamy.
One thing worth knowing upfront—hooded eyes, humid weather, and marathon-length days are not exactly gloss's best friends. Save this one for the right moment and it will not disappoint.
How to Pick the Best Glitter Eyeshadow for Your Needs
Here's the thing about glitter eyeshadow: not all formulas are built the same, and picking the wrong one can mean the difference between a look that wows and one that just... falls off your face. Literally.
Start with particle size—micro-glitter keeps things subtle and daytime-appropriate, while chunky glitter is basically made for festival season. From there, check whether the formula has a pigmented base (great for wearing solo) or a sheer one (your new favorite topper).
If you have sensitive eyes, water-based liquids and pressed formulas with hydrating ingredients are worth seeking out. And when you're scanning product descriptions, words like "holographic," "no fallout," and "long-wear" are genuinely good signs—they usually mean the formula has been thought through and the sparkle will actually stay put.
Glitter Eyeliner and Graphic Sparkle Eye Looks
Glitter eyeliner has come a long way from the chunky craft-store tubes of our youth. Modern formulas use adhesive bases that lock sparkle in place—zero fallout, zero mess, all the drama. Whether you're after a subtle shimmer flick or a full-on graphic wing, glitter liner is honestly the easiest way to make your eye look feel like a moment.
Your Guide to Everyday Glitter Liner That Actually Looks Polished
Here's the thing about glitter liner: it doesn't have to be a whole production. A tiny flick of sparkle at the inner corner is enough to make your eyes look bright and awake on a Tuesday morning.
If you want to ease into it, try layering a thin line of glitter liner right over your usual black liner—it adds just enough dimension without screaming "I tried really hard." A little shimmer along the lower lash line is another low-commitment move that reads flirty and fresh without taking over your whole face.
The trick is placing the sparkle where it naturally enhances your eye shape, so it looks intentional rather than accidental.
Ready to Go Bold? Master Graphic Glitter Lines and Double Wing Effects
If you're ready to commit to the full sparkle moment, here's how to make it look sharp instead of chaotic. Start by mapping out your wing shape with tiny dots before you commit to a full line—it's basically a cheat code for symmetry.
Trace the outline with black liner first, then layer your glitter on top using a thin angled brush for control. Tape along the outer corner keeps edges crisp, and a damp cotton swab cleans up any wobbles.
For color combos that actually work: turquoise glitter against silver shadow feels editorial, while mixing chrome and warm gold tones gives you that rich, dimensional finish. Keeping the space around the liner clean is what makes the sparkle pop.
The Perfect Match: Pairing Glitter Liner With Gold Eyeshadow Looks
Gold eyeshadow and glitter liner together? Genuinely one of the most foolproof combinations in makeup. You can go as sheer or as smoky as you want with the shadow—a soft wash, a spotlight on the lid, or a full sultry base all work—and the glitter liner traces the edges to pull everything together.
Warm honeyed golds tend to look incredible on deeper skin tones, while cooler, champagne-leaning shades complement fair complexions beautifully. Once your eyes are doing the heavy lifting, keep the rest of your look soft: dewy skin, a flushed cheek, and a glossy lip let the gold do its thing without the whole look feeling like too much.
Your Foolproof Guide to Clean Glitter Removal (No Eye Irritation!)
Glitter liner is fun to wear and genuinely not fun to remove if you go about it the wrong way. The key is an oil-based remover—a cleansing balm or micellar water works great—to break down the adhesive formula without any tugging.
Use a cotton swab soaked in remover and work from the outer corner inward along the lash line, letting the formula dissolve the product instead of dragging it across your eye. Rubbing dry or reaching for a harsh wipe is a one-way ticket to irritation (and glitter in places glitter should never be).
If you get some daytime fallout, gently press a piece of tape against your skin to lift stray sparkle without disturbing the rest of your makeup underneath.
Once you've got your glitter liner routine dialed in, that same precision mindset applies everywhere—because when sparkle is involved, a little intention goes a long way.
Face Glitter, Face Jewels, and Rhinestones for Elevated Festival Glam
Face gems and glitter are having a serious moment right now. Whether you're going full celestial goddess or just want a subtle sparkle accent that catches the light at the right angle, we've got the adhesive tips, skin prep secrets, and placement tricks to make it all come together—and actually stay put.
Your Guide to Flawless Face Glitter Application
The secret to glitter that looks intentional (not like you hugged a craft store shelf)? It all starts with your base. Hydrated, primed skin keeps sparkle from settling into dry patches and gives your glitter something smooth to grip onto.
Apply it to the high points of your face—cheekbones, temples, the bridge of your nose—using a flat brush or your fingertip, then blend outward for that seamless, lit-from-within finish. Want extra dimension? Layer fine glitter right over a cream highlighter and watch it come alive.
For gems and glitter that actually last, face glue is your best friend. Swipe on a thin layer with a brush, give it 30 to 60 seconds to get tacky, then press your gems into place. When it's time to take everything off, reach for an oil-based remover or baby oil, let it soak in, and gently peel—no scrubbing, especially near your eyes. Your skin barrier will thank you.
Eye Gem Placement That Actually Flatters Your Features
The difference between gems that look editorial and gems that look accidental? Placement. A few go-to recipes worth trying: an inner-corner duo for a subtle, wide-awake sparkle, micro-gems following your liner for graphic drama, or a cluster along the brow arch to lift and frame your eyes. Round eye shapes love outward-extending placements, while almond eyes can honestly pull off almost any configuration.
One placement tip to keep in mind: keep gems away from your tear ducts, where moisture tends to cause lifting throughout the day. And don't overthink symmetry—a little asymmetry actually makes gem looks feel more artistic and intentional, less like a sticker sheet. Lean into it.
Camera-Ready Gem Looks That Shine in Every Selfie
Planning a gem look for photos? Think about how your design will read on camera before you start placing. Larger rhinestones create bold focal points that translate beautifully, while tiny gems add delicate detail without overwhelming your features in close-up shots. High-shine or iridescent finishes are your best bet for flash photography—they catch light in the most gorgeous way.
Balance is everything here. Pair your gem placement with soft blush and a touch of highlighter to frame the sparkle, and keep lips neutral or glossy so the whole look feels cohesive rather than cluttered. Strategic spacing is key—when gems are too close together, they can read as one big blob on camera instead of the intentional, jewel-studded moment you actually created.
Face glitter and rhinestones are just the start—once you've mastered facial sparkle, take that glow everywhere, from your collarbones to your hairline.
Body Glitter and Hair Rhinestones for Head-to-Toe Sparkle
From shimmering shoulders to sparkling strands, taking glitter beyond the eyes is where the real fun begins—here's how to pull it off without a hitch.
Where to Apply Body Glitter for a Flattering Glow
When it comes to body glitter, placement is everything. The sweet spots? Collarbones, shoulders, and shins—basically anywhere light naturally catches and bounces.
For something more subtle, dust fine glitter lightly across your décolletage for a glow that reads more "lit-from-within" than full-on disco ball. If you're going bold, layer chunky and fine glitter over adhesive for a dimensional, camera-ready effect that looks stunning in photos and even better in person.
How to Prevent Transfer Onto Clothes and Keep Glitter Comfortable
There's nothing worse than putting in all that effort and ending up with glitter all over your outfit instead of your skin. The fix: let everything fully set before you get dressed.
Use a skin-safe adhesive—cosmetic glitter glue or even aloe vera gel work beautifully—and apply in thin layers so it doesn't feel heavy or tacky. Once it's dry, lock it in with a setting spray.
If you're applying to more sensitive areas, stick with fine-milled glitter over chunky formulas, and always reach for cosmetic-grade options to keep irritation out of the equation.
Hair Rhinestones and Glitter Extensions That Stay Put
Hair sparkle has officially had its moment—and honestly, it's not going anywhere. The good news is that getting it to actually last is way easier than it looks.
For part-line rhinestones, a tiny dab of eyelash glue or hair gel is all you need to secure each gem along your part or hairline. Glitter extensions look dreamy wrapped around a ponytail base or woven through braids.
Just let everything set before running your fingers through it, then finish with a light mist of hairspray to lock it in. When it's time to take it all off, loosen gently with a damp cloth—no pulling, no tugging, no drama.
Creating Your Sparkle Story From Eyes to Everywhere
The real secret to a head-to-toe glitter moment that actually works? Making sure everything feels intentional, like it all belongs together.
Start by matching your undertones—warm gold body shimmer pairs beautifully with bronze lids, while cool silver glitter feels right at home alongside an icy blue shadow. Then think about balance: you want your sparkle distributed in a way that feels cohesive, not competing.
A touch of matching glitter in the inner corner is a sneaky little trick that ties the whole look together. Try a champagne glow on your collarbones with rose-gold eyeshadow for something romantic and dreamy, or go full disco mode with chunky silver glitter on the shoulders and a graphic metallic liner moment.
The Glitter Glow-Up: Your Final Sparkle Strategy
Glitter makeup is all about intention—knowing which finish works where, how to apply it, and when to dial it up or down. Whether it’s a subtle shimmer on the inner corner, sleek liquid shadow, or full-on festival sparkle, start with great prep and precise placement. New to glitter? Begin with metallic liner or micro-shimmer shadow, then work up to gems and body sparkle. Ready to stock up? Explore the IPSY Shop for shadows, liners, adhesives, and accessories—up to 70% off. Shop now.
Liked this post? Share!
Related Stories


Makeup
6 Beauty Brands Reinventing the Packaging Game
4 min read


Makeup
The Ultimate Makeup Mood Board for Cancer Season
4 min read


Makeup
Every Time Dua Lipa Gave Us a New Makeup Obsession
3 min read


Makeup
Hilary Duff Has Been Serving Beauty Inspiration Since 2003
3 min read


Makeup
Glossy Lids, Textured Metallics, and the Return of Maximalist Eye Makeup
5 min read


Makeup
9 New Makeup Look Ideas for the Most Glam Summer Ever
5 min read


Makeup
The Best Volumizing Mascaras for Bigger, Bolder Lashes
9 min read


Makeup
Lip Products Are Entering Their Care Era
5 min read

Beauty Picked Just for You
Get 5 products worth up to $70
Exclusive access to epic deals up to 80% off
Starting at just $15/month. Cancel anytime.